Azure
Mount an Azure Storage container or file share as a Windows drive.
Before you begin
Prepare the following in advance:
- The Storage Account name and a Key, or an Azure sign-in that can list your subscriptions and storage accounts.
- The type you are mounting: Blob container or File share.
Where to get the key — in the Azure portal:
- Open your storage account.
- Go to Security + networking → Access keys.
- Click Show on key1 (or key2) and copy the key value.
Help from Microsoft
Connect
- Click Add in the toolbar.
- Choose Enterprise → Azure.
- Enter the Storage Account name and Key, and select the Type: Object (Container) for a Blob container or File for a file share. Alternatively sign in with your Azure account and pick the subscription, storage account, and container from the lists.
- Click Connect.
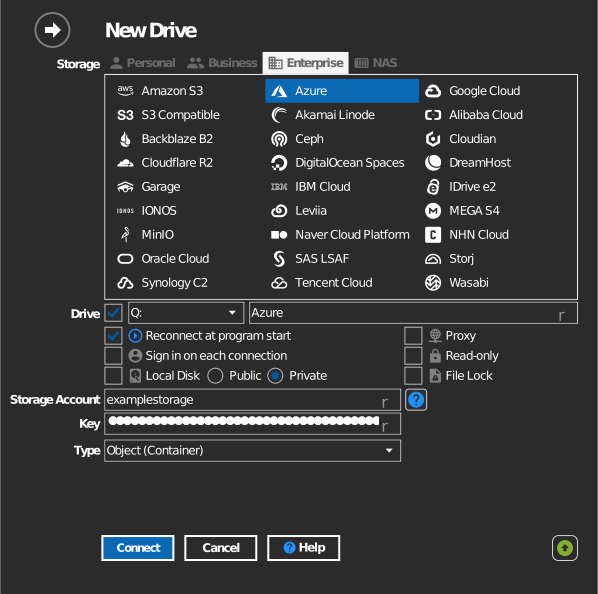
Settings
| Setting | Description | Default |
|---|---|---|
| Storage Account / Key | Account name plus one of its two access keys | — |
| Type | Object (Container) = Blob container, File = File share | Object (Container) |
| Container / Share | The container or share to mount | — |
| Read-only | Blocks writes to the mounted drive | off |
Behavior & limits
- File shares (Azure Files) behave like SMB shares and support true directories.
- Access-tier rules apply: Archive-tier blobs cannot be opened until they are rehydrated — see Microsoft: rehydrate an archived blob.
Troubleshooting
| Symptom | Cause | Fix |
|---|---|---|
| Authentication failed | Key was regenerated in the portal | Copy the current key from Access keys and update the drive |
| Container list empty after sign-in | Account lacks a role on the subscription | Ask for Reader (or higher) on the storage account |
| A blob cannot be opened | Blob is in the Archive tier | Rehydrate it to Hot/Cool in the portal first |