Synology
Mount a Synology NAS as a Windows drive over WebDAV. Install the WebDAV Server package in DSM, and set up DDNS to reach the NAS from outside your network.
Before you begin
Prepare the following in advance:
- Install and enable the WebDAV Server package in DSM.
- For access from outside your network, set up DDNS: DSM → Control Panel → External Access → DDNS → Add.
- Default WebDAV ports: 5005 (http) / 5006 (https).
Help from Synology
Connect
- Click Add in the toolbar.
- Choose NAS → Synology.
- Select https, enter the server address (DDNS hostname or IP) and port, then your DSM username and password.
- Pick the TLS/SSL version matching your DSM setting, and click Connect.
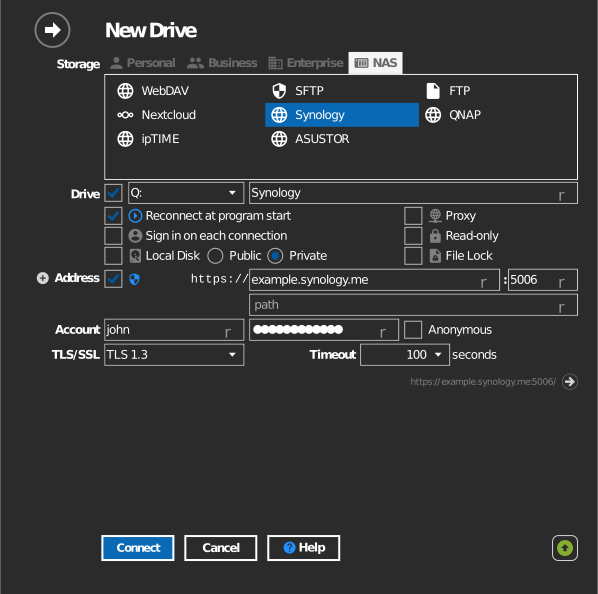
Settings
| Setting | Description | Default |
|---|---|---|
| Protocol | https or http | https |
| Address / Port | NAS host and WebDAV port | 5006 (https) |
| Path | Shared folder mounted as the drive root | all shares |
| TLS/SSL | TLS version used for https | auto |
| Timeout | Seconds to wait for a server response | — |
| Read-only | Blocks writes to the mounted drive | off |
Behavior & limits
- DSM's TLS/SSL profile level decides which TLS versions the NAS accepts (Control Panel → Security → Advanced): Modern = TLS 1.3 only, Intermediate = 1.2/1.3, Old backward = 1.0–1.3. Match RaiDrive's TLS/SSL setting to it — see Synology: TLS/SSL profile level.
- DSM shared-folder permissions are enforced on the drive.
Troubleshooting
| Symptom | Cause | Fix |
|---|---|---|
| Connection refused | WebDAV Server package not running | Start/install the package in DSM |
| TLS handshake fails | DSM profile set to Modern, old TLS selected | Select TLS 1.3, or lower the DSM profile level |
| Works on LAN only | Ports 5005/5006 not forwarded | Forward the port on your router; use the DDNS hostname |
| Trying to connect via QuickConnect fails | Synology QuickConnect does not support WebDAV/SFTP/FTP | Use a DDNS hostname (or IP) and the WebDAV port instead — see forum thread |