FTP
Mount an FTP or FTPS server as a Windows drive.
Before you begin
Prepare the following in advance:
- The FTP service must be enabled on the server:
- Synology
- QNAP
- ASUSTOR
- The server address and port (21 for ftp/explicit ftps by default).
- A user account, unless the server allows anonymous access.
Help from Synology
Help from QNAP
Help from ASUSTOR
Connect
- Click Add in the toolbar.
- Choose NAS → FTP.
- Select ftp or ftps, and enter the server address and port.
- Optionally enter a path to mount a subfolder as the drive root.
- Enter the username and password, or tick Anonymous.
- Adjust Charset, Transfer Mode, and (for ftps) TLS/SSL if needed, then click Connect.
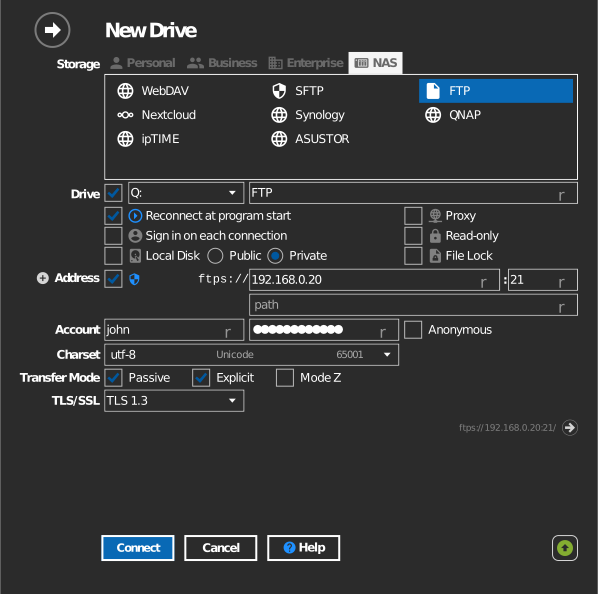
Settings
| Setting | Description | Default |
|---|---|---|
| Protocol | ftp or ftps (TLS) | ftp |
| Address / Port | Server host and port | port 21 |
| Path | Server folder mounted as the drive root | server root |
| Anonymous | Connect without credentials | off |
| Charset | File-name encoding of the server | UTF-8 |
| Transfer Mode | Passive or active data connections | passive |
| TLS/SSL | TLS version — ftps only | auto |
| Read-only | Blocks writes to the mounted drive | off |
Alternate address
Click the + next to Address to add a second line for a backup server address. The path stays the same as the primary address. If RaiDrive cannot connect with the primary address, it tries the alternate address automatically.
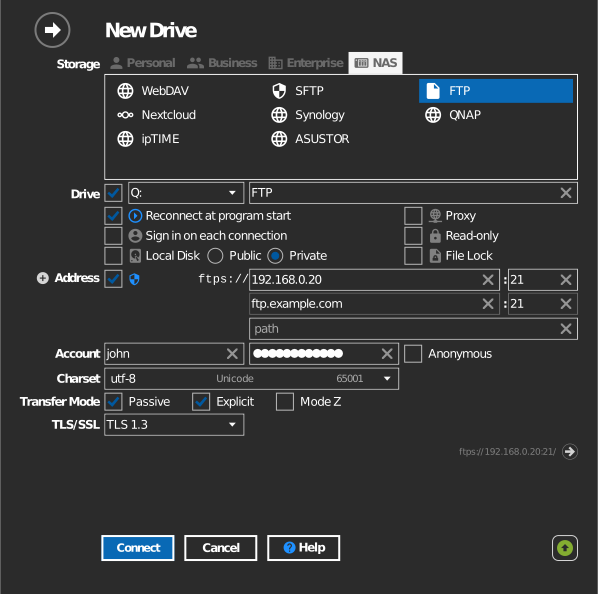
Behavior & limits
- Plain ftp sends credentials unencrypted — use ftps (or SFTP) on any untrusted network.
- FTP has no partial-write support; files are transferred whole. Editing very large files in place re-uploads them on save.
- Wrong charset shows garbled non-ASCII file names — pick the encoding the server actually uses (older NAS firmware is often EUC-KR / CP949 or Shift-JIS rather than UTF-8).
Troubleshooting
| Symptom | Cause | Fix |
|---|---|---|
| Directory listing hangs | Active mode blocked by NAT/firewall | Use passive transfer mode |
| Korean/Japanese names garbled | Charset mismatch | Change the charset in the drive's Options |
| ftps connects then errors | TLS version rejected by server | Select the TLS/SSL version the server accepts |